Flask Includes Tutorial
Welcome to the next installment of Flask tutorials. In this tutorial, we're going to be discussing including templates, as compared to extending templates.
If you recall, extending templates was useful for things like headers and footers that would be on every page. Extending templates meant you had a main template, like a header.html, and then every other file pretty much "extended" that main one. What if, however, you some something like, say, a comment box that you want to have on a lot of pages, but not necessarily all? Maybe instead of a comment box, it's some questions and challenges to conditionally appear for +=1 subscribers, who knows! How might we do something like this?
As you can probably guess by the title of this tutorial, we'd do it with an include. Mainly, I use includes for snippets of HTML. Not only can you include typical HTML, but your variables and logic can also continue on through the include itself.
It has been some time since I last produced Flask tutorials, the next few tutorials, you will not actually need to use the same starting files as me. If you would like to use the same starting files: PythonProgramming.net sample files. Download or copy the files to your Flask directory. Note: You will need a user system if you plan for that functionality to work.
Looking into our __init__.py file, we'll find a spot for a new page at the url of '/include_example/'
Notably, this __init__.py file is quite bloated. The content management started off fine, but it scales horribly, showing off poor foresight. At the time, I didn't know of a decent way to handle for this dynamically, but we'll get to how to handle it later in this tutorial.
@app.route('/include_example/')
def include_example():
	return render_template("includes_tutorial.html")
Now we need an includes_tutorial.html:
{% extends "header.html" %}
{% block body %}
<body class="body">
	  <div class="container-fluid">
		<p>Hi.</p>
	  </div>
</body>
{% endblock %}
So far, we're extending a template, but not including various snippets. Let's try to include a snippet. I like to include my includes in a separate include directory within the templates directory. For example, let's create templates/includes/commentbox.html.
{% block body %}

	{% if session['logged_in']%}
		<form action="" class="form" method="post" id="replyform">
			<label for="post">Reply:</label>
			<textarea class="form-control" rows="4" cols="50" name="reply_content" form="replyform"></textarea>
			<br>
			<input class="btn btn-primary" type="submit" value="submit">
			<br>
			<br>
		</form>
	{% else %}
	<p>You must be <a href="/login/">logged in</a> to post!</p>
	{% endif %}

{% endblock %}
We can now "include" this snippet of code like so: (this is within the templates/includes_tutorial.html file)
{% extends "header.html" %}
{% block body %}
<body class="body">
	  <div class="container-fluid">
		{% include 'includes/commentbox.html' %}
	  </div>
</body>
{% endblock %}
Now, so far, we've got a snippet of HTML that we can include anywhere we want. This code will add a "reply box" of sorts to any page, or have a requirement to login to reply if the user is not logged in. That said, we are almost certain to not only want to display the reply box, but also the previous replies. We don't have a database of replies, so let's just make some up. Normally, you would call upon a function that would grab replies for that page, so we'll put a dictionary of "replies" in our include_example function within our __init__.py file:
@app.route('/include_example/')
def include_example():
	replies = {'Jack':'Cool post',
			   'Jane':'+1',
			   'Erika':'Most definitely',
			   'Bob':'wow',
			   'Carl':'amazing!',}
	return render_template("includes_tutorial.html", replies = replies)
Great, so we're passing the replies to the includes_tutorial.html file, but we actually want to access these replies in our templates/includes/commentbox.html file. Luckily for us, this is easily done behind the scenes, and all we need to do is modify our templates/includes/commentbox.html file to handle the replies variable however we want.
{% block body %}

	{% if session['logged_in']%}
		<form action="" class="form" method="post" id="replyform">
			<label for="post">Reply:</label>
			<textarea class="form-control" rows="4" cols="50" name="reply_content" form="replyform"></textarea>
			<br>
			<input class="btn btn-primary" type="submit" value="submit">
			<br>
			<br>
		</form>
	{% else %}
	<p>You must be <a href="/login/">logged in</a> to post!</p>
	{% endif %}

	{% for r in replies %}
		<div class='well'>
			<p>{{replies[r]}}</p>
			<p>-{{r}}</p>
		</div>
	{% endfor %}

{% endblock %}
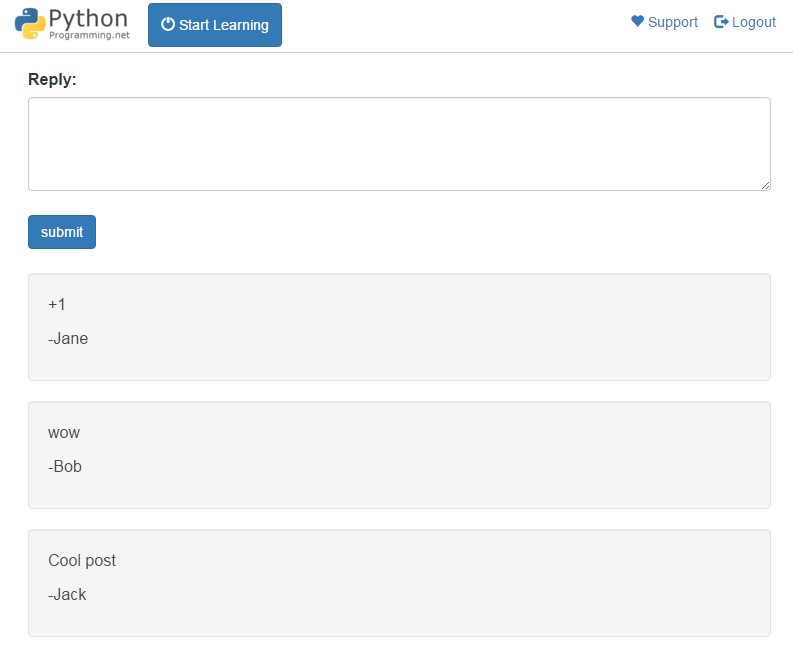
Now, below our reply box, whether or not the user is logged in, we iterate through the replies and display them on screen. This is not the most beautiful looking, so feel free to improve on it if you like. The current look should be something like:
As you can see, includes can be very useful and powerful. In the next tutorial, we're going to discuss some of the conversion and code options within Jinja templating, like converting to strings, integers, displaying plausibly risky code, and replace operations.
There exists 2 quiz/question(s) for this tutorial. for access to these, video downloads, and no ads.
-
Introduction to Practical Flask
-
Basic Flask Website tutorial
-
Flask with Bootstrap and Jinja Templating
-
Starting our Website home page with Flask Tutorial
-
Improving the Home Page Flask Tutorial
-
Finishing the Home Page Flask Tutorial
-
Dynamic User Dashboard Flask Tutorial
-
Content Management Beginnings Flask Tutorial
-
Error Handling with Flask Tutorial
-
Flask Flash function Tutorial
-
Users with Flask intro Tutorial
-
Handling POST and GET Requests with Flask Tutorial
-
Creating MySQL database and table Flask Tutorial
-
Connecting to MySQL database with MySQLdb Flask Tutorial
-
User Registration Form Flask Tutorial
-
Flask Registration Code Tutorial
-
Finishing User Registration Flask Tutorial
-
Password Hashing with Flask Tutorial
-
Flask User Login System Tutorial
-
Decorators - Login_Required pages Flask Tutorial
-
Dynamic user-based content Flask Tutorial
-
More on Content Management Flask Tutorial
-
Flask CMS Concluded Flask Tutorial
-
The Crontab Flask Tutorial
-
Flask SEO Tutorial
-
Flask Includes Tutorial
-
Jinja Templating Tutorial
-
Flask URL Converters Tutorial
-
Flask-Mail Tutorial for email with Flask
-
Return Files with Flask send_file Tutorial
-
Protected Directories with Flask Tutorial
-
jQuery with Flask Tutorial
-
Pygal SVG graphs with Flask Tutorial
-
PayPal with Flask Web Development Tutorial
-
Securing your Flask website with SSL for HTTPS using Lets Encrypt