Introduction - Deep Learning and Neural Networks with Python and Pytorch p.1
Hello and welcome to a deep learning with Python and Pytorch tutorial series. It's been a while since I last did a full coverage of deep learning on a lower level, and quite a few things have changed both in the field and regarding my understanding of deep learning.
For this series, I am going to be using Pytorch as our deep learning framework, though later on in the series we will also build a neural network from scratch.
I also have a tutorial miniseries for machine learning with Tensorflow and Keras if you're looking for TensorFlow specifically.
Once you know one framework and how neural networks work, you should be able to move freely between the other frameworks quite easily.
What are neural networks?
I am going to assume many people are starting fresh, so I will quickly explain neural networks. It's my belief that you're going to learn the most by actually working with this technology, so I will be brief, but it can be useful to have a basic understanding going in.
Neural networks at their core are just another tool in the set of machine learning algorithms.
Neural networks consist of a bunch of "neurons" which are values that start off as your input data, and then get multiplied by weights, summed together, and then passed through an activation function to produce new values, and this process then repeats over however many "layers" your neural network has to then produce an output.
It looks something like
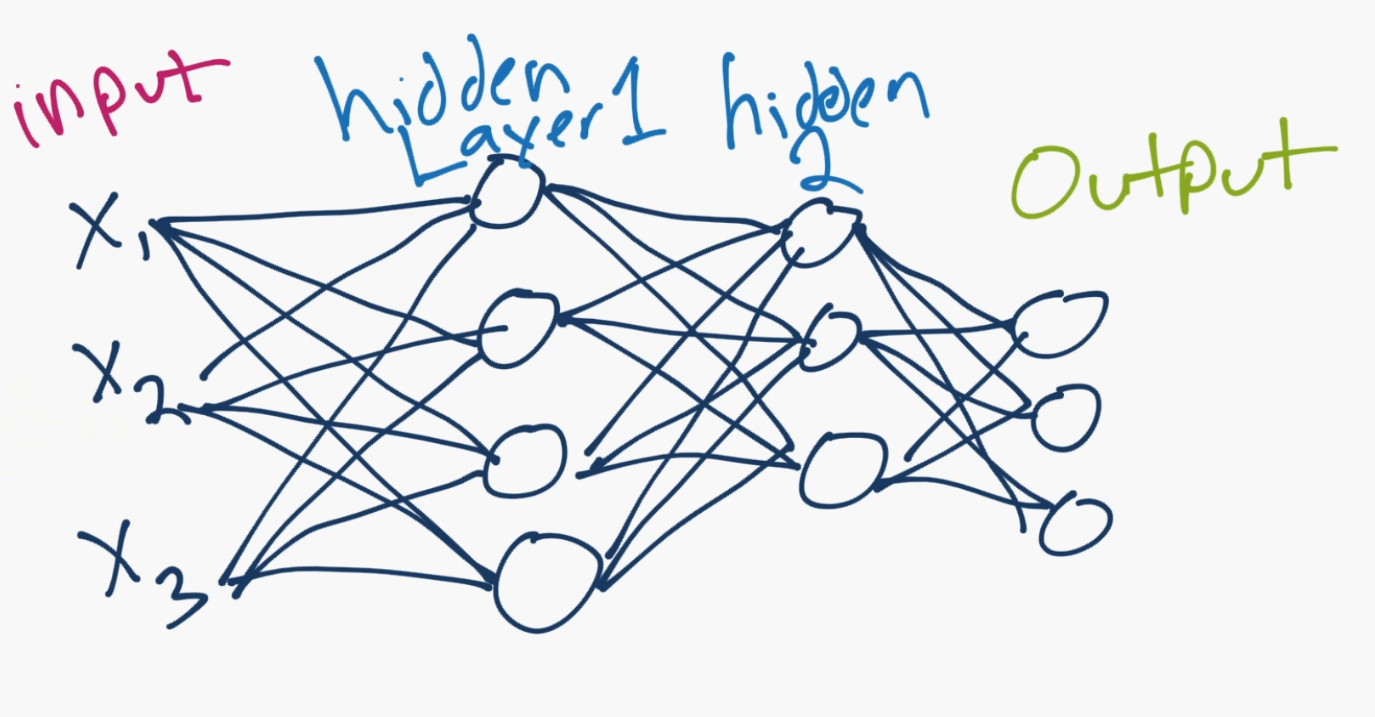
The X1, X2, X3 are the "features" of your data. These could be pixel values of an image, or some other numerical characteristic that describes your data.
In your hidden layers ("hidden" just generally refers to the fact that the programmer doesn't really set or control the values to these layers, the machine does), these are neurons, numbering in however many you want (you control how many there are, just not the value of those neurons), and then they lead to an output layer. The output is usually either a single neuron for regression tasks, or as many neurons as you have classes. In the above case, there are 3 output neurons, so maybe this neural network is classifying dogs vs cats vs humans. Each neuron's value can be thought of as a confidence score for if the neural network thinks it's that class.
Whichever neuron has the highest value, that's the predicted class! So maybe the top of the three output neurons is "human," then "dog" in the middle and then "cat" on the bottom. If the human value is the largest one, then that would be the prediction of the neural network.
Connecting all of the neurons are those lines. Each of them is a weight, and possibly a bias. So the inputs get multiplied by the weights, the biases are added in, then it gets summed at the next neuron, passed through an activation function, to be the next input value for the next one!
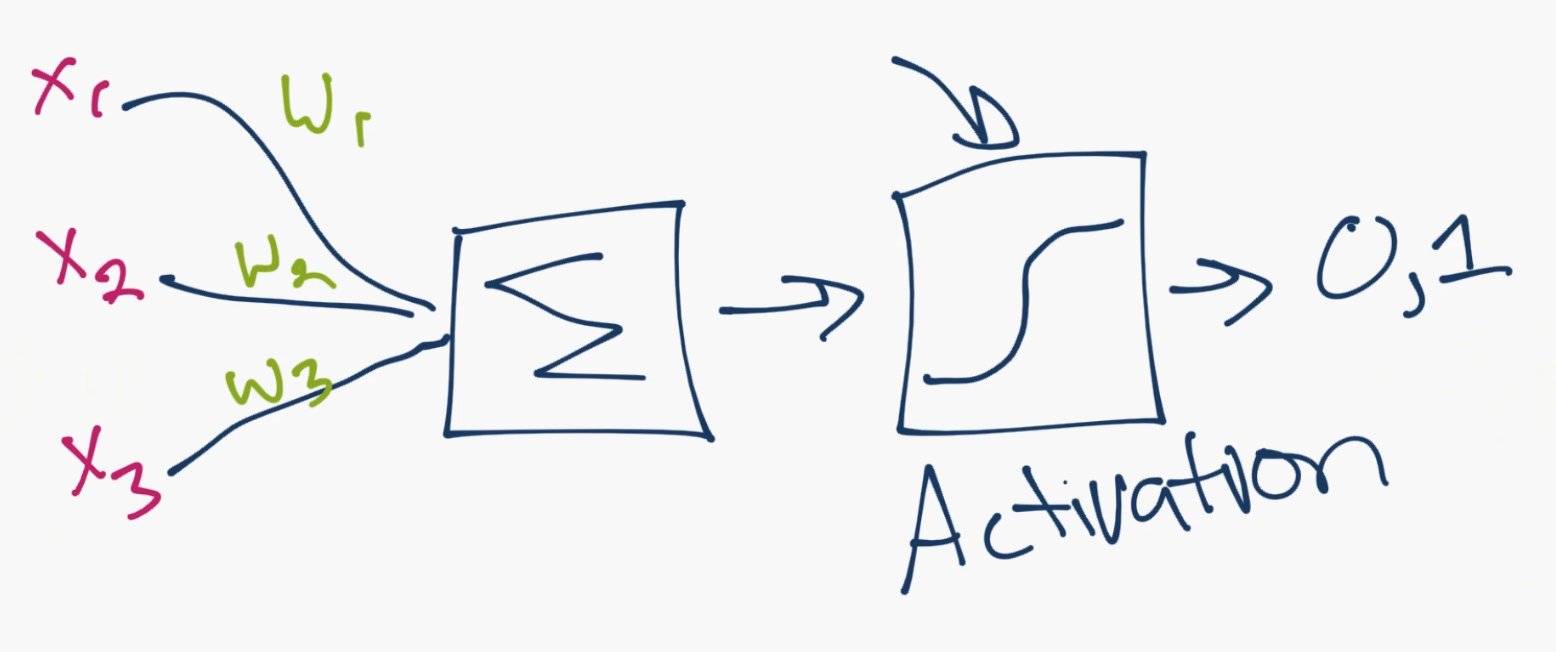
Above is an example of this "zoomed in" so to speak to show the mechanism for just a single neuron. You can see the inputs from other neurons come in, they're multiplied by the weights, then they are summed together. After this summation, they pass through an activation function. The activation function's job is to calculate whether or not, or how much, a neuron is "firing." A neuron could output a 0 or 1 to be off or on, but also, more commonly, could instead output a range between 0 and 1, for example, which serves as input to the next layer.
How does a neural network "learn?"
For now, we'll just consider the "supervised learning" approach, where the programmer shows the neural network the input data, and then also tells the machine what the output should be.
It then becomes the machine's job to figure out how to adjust the weights (every line is a weight) such that the output of the model is as close as possible to the classifications that the programmer tells the machine that everything is. The machine aims to do this not just for a single sample, but for up to millions, or more of samples! ...hunting by slowly tweaking weights, like turning and tweaking nobs in the system, in such a way so as to get closer and closer to the target/desired output.
Alright, you're basically an expert now. Let's get to Pytorch. If you're still confused about certain things, that's totally fine. Most, if not all, should be ironed out by actually working with this stuff. If you are confused at any point, however, just come to the discord channel: discord.gg/sentdex and ask your question in one of the help channels.
What you will need for this series:
- Python 3+. I will be using Python 3.7 specifically.
- Pytorch. I am using version 1.2.0 here.
- Understanding of the Python 3 basics
- Understanding of OOP and other intermediate concepts
Optionally, you may want to be running things on a GPU, rather than your CPU.
Why GPU?
We often want to run on the GPU because the thing we do with these tensor-processing libraries is we compute huge numbers of simple calculations. Each "core" of your CPU can only do 1 thing. With virtual cores, this doubles, but CPUs were meant to work on much more complicated, hard-to-solve, problems at a time. GPUs were intended to help generate graphics, which also require many small/simple calculations. As such, your CPU probably does somewhere between 8 and 24 calculations at a time. A decent GPU will do *thousands.*
For this tutorial, you can still follow along on your CPU, and probably any CPU will work. For just about any practical use-case of deep learning,however, you really are going to need a good GPU.
Cloud GPUs
There are some "free" platforms that do offer GPUs on a free tier, but, again, this wont be practical for any real case, and eventually you will want to upgrade your account there and then you will be paying prices typically above industry standard for what you're getting. There are no corners to cut, at some point, you're going to want a high-ish end GPU locally, or in the cloud.
Currently, in the cloud, the best bang for your buck option is Linode.com. I have a tutorial on how to efficiently make use of your cloud GPU as well, which uses Linode.
1.50 USD an hour can still be cost prohibitive, however, and many tasks wont need this kind of power. For the next best option, there is Paperspace, which offers cheaper GPUs and is super simple to setup. Here, you can get a deep-learning viable GPU for $0.50/hr, and you only pay while your machine is turned on.
Local GPUs
If you want to use your own GPU locally and you're on Linux, Linode has a good Cuda Toolkit and CuDNN setup tutorial.
If you're on Windows, then just get Cuda Toolkit 10.0.
Next, download CuDNN for Cuda Toolkit 10.0 (you may need to create an account and be logged in for this step).
Install the CUDA Toolkit, then extract the CuDNN files. From those CuDNN files (the dirs bin, include, and lib), you just need to move them to your Cuda Toolkit location, which is likely: C:\Program Files\NVIDIA GPU Computing Toolkit\CUDA\v10.0, which should also have bin, include, and lib dirs which you will merge with.
If you're having a hard time with this, come to Discord.gg/sentdex and we'll help to get you setup!
...or you can just stick with the CPU version of things!
What is Pytorch?
The Pytorch library, like the other deep learning libraries, really is just a library that does operations on tensors.
What's a tensor?!
You can just think of a tensor like an array. Really all we're doing is basically multiplying arrays here. That's all there is to it. The fancy bits are when we run an optimization algorithm on all those weights to start modifying them. Neural networks themselves are actually super basic and simple. Their optimization is a little more challenging, but most of these deep learning libraries also help you a bit with that math. If you want to learn how to do everything yourself by hand, stay tuned later in the series. I just don't think it would be wise to lead with that.
So, let's poke with some tensors.
import torch

x = torch.Tensor([5,3])
y = torch.Tensor([2,1])

print(x*y)
So yeah, it's just [5 2, 3 1]. Simple stuff!
Because it's a lot of operations on arrays, Pytorch aims to mimic the very popular numeric library in Python called NumPy. Many of the exact same methods exist, usually with the same names, but sometimes different ones. One common task is to make an "empty" array, of some shape. In NumPy, we use np.zeros. In Pytorch, we do the same!
x = torch.zeros([2,5])
print(x)
print(x.shape)
If you need to generate an array of random values, but a specific shape
y = torch.rand([2,5])
print(y)
And no, I am not wasting your time with any of these examples. We will be using all of these methods, and learning more along the way.
For the last one, how about a reshape? It turns out Pytorch decided to come up with a new name that no one else uses, they call it .view()
For people coming here from Numpy or other ML libraries, that'll be a goofy one, but pretty quick to remember.
So, in the above, we have 2 tensors, with 5 values in each. We could flatten this to be 1 tensor with 10 values. To do this, we would use .view():
y.view([1,10])
I don't totally mind this naming convention. You're literally "viewing" that tensor as a 1x10 now. It doesn't actually modify the tensor:
y
Of course you can re-assign:
y = y.view([1,10])
y
Alright, there's your super fast introduction to Pytorch and neural networks. In the next tutorial, we'll be working on the input to our neural network, the data.
One of the very few things that we have control over when it comes to neural networks is the data, and the format/structure of this data.
First we have to acquire that data, then we have to consider how to convert the data to numerical values, consider things like scaling, and then figure out how we will be showing this data to the neural network.
-
Introduction - Deep Learning and Neural Networks with Python and Pytorch p.1
-
Data - Deep Learning and Neural Networks with Python and Pytorch p.2
-
Building our Neural Network - Deep Learning and Neural Networks with Python and Pytorch p.3
-
Training Neural Network - Deep Learning and Neural Networks with Python and Pytorch p.4
-
Convolutional Neural Networks - Deep Learning and Neural Networks with Python and Pytorch p.5
-
Convolutional Neural Nework Model - Deep Learning and Neural Networks with Python and Pytorch p.6
-
Running on the GPU - Deep Learning and Neural Networks with Python and Pytorch p.7
-
Basic Network Analysis and Visualizations - Deep Learning and Neural Networks with Python and Pytorch p.8